Windows server 2008 is a Windows operating system intended for server use which is usually used by companies, in this case of course security on server devices is needed, especially on firewalls.
The firewall itself has a function to protect the device from outside attacks. In this case we will do how to configure a basic firewall on a Windows server.
1. Opening Windows Firewall and Advanced Security
Here you can use the power shell or search panel on the Windows menu. I will give an example if you use the power shell command for your little knowledge.
First you open powershell, as shown below:
Then continue with the following command:
PS C:\Users\user> wf.mscThen it will appear windows firewall and advanced security.
2. Network Firewall Configuration
Basically, the default given by Windows will block connections from outside going in or it can be called an inbound connection, before starting I will explain what is inbound and outbound on a network connection.
- Inbound Connection is a connection made from outside to inside the device network, be it from a different router or a different device, for example, device A will ping device B, inside device B will be called inbound while inside device A will be called outbound.
- Outbound Connection is a connection made from inside to outside the device network.
- Public Network
- Private Network
- dan Work Network
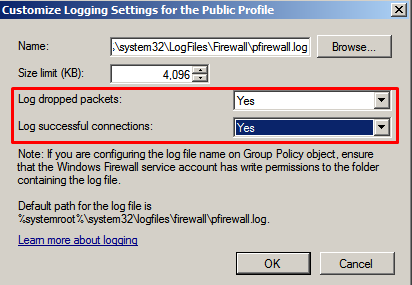
- Still in the Public Profile menu and previous configuration, select logging > customize
- You can choose where the logs will be stored, the max log size, and what packages you want stored in the log file.
- Here I only make changes to the drop log and success log so that it is captured in the firewall log file and we can analyze it if there is an anomaly.

Now we will test on a Linux device to ping with the first test, namely packet drop, here we will first block the inbound connection.
- Enable notifications to be notified when there are connections that have been blocked but are still able to log in.
- Then select "yes".


2 Comments
mantap mas e
ReplyDeleteThanks mas
Delete